
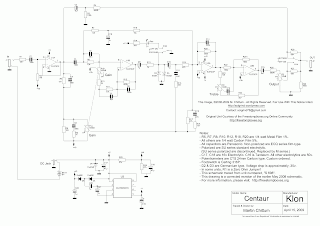
*UPDATE* For fully up to date schematics and layouts of the original Klon we, at freestompboxes.org, bought to reverse engineer please check out freestompboxes.org . Thanks to Soulsonic we have a great project on the way too 🙂
Demo Video;
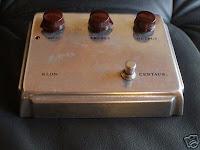
The KLON Centaur, one of the rarest and most sought after overdrive pedals currently available. With current production models costing in excess of $320 and ebay prices in the $500 range the Klon Centaur was a great candidate for reverse engineering. The schematic has been available for some time in closed circles but many are reluctant to share the information about the Klon Centaur freely until recently when a few guys got together and really made things happen. Great work and many thanks guys, you all know who you are!
So, what did I think of the Klon Centaur when I first saw the schematic? Well, it certainly isn’t a tubescreamer or other common overdrive clone. It truly is an original circuit which utilizes some great ideas.
The Klon basically splits the signal into 3 parts – highs, mids and lows – the mid and low sections are “eq”ed and the highs are run through an overdrive circuit before the three parts are mixed back together again with an opamp mixer section – which is run off a charge pump supplying a dual polarity supply to stop any further clipping taking place. As the gain is increased the level of mids and lows present in the final mix is reduced, this is controlled via a dual taper pot which simultaneously increases the overdrive gain and reduces the level of the mid and low sections. The tone control is an active treble boost/cut allowing the level of the highs to be adjusted to taste.

Here you can see the copper clad PCB board after I printed the PCB trace onto “glossy” paper (Taken from a magazine I found lying around!) using a laser toner printer. I then ironed the print out onto the copper board until it was firmly stuck down. Next I soaked PCB board with attached paper in water until I could easily rub the paper away with my finger. As you can see this leaves the PCB trace attached to the copper board.
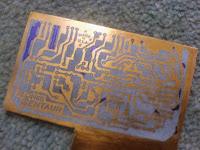 Here is the PCB before it is trimmed down and placed in the Ferric Chloride etching solution. You can see some small fills that I made with a permanent marker.
 Here’s the PCB in the Ferric Chloride. Etching away! This can take from 15 minutes to an hour, depending on the strength and temperature of the etching solution.
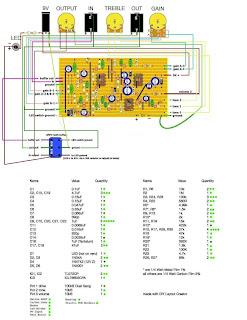
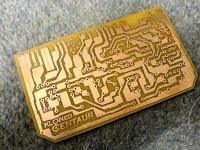 The finished PCB, cleaned with steel wool, trimmed and drilled. Now it’s ready for population!
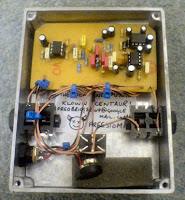
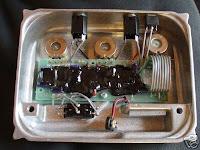
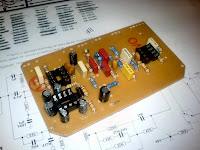 The PCB being populated. I need a box to put this thing in. I wonder what it should look like?
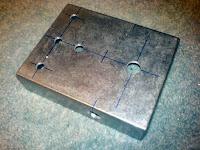 A nice Hammond BB Sized enclosure – marked out and drilled. It looks boring – I need some graphics!
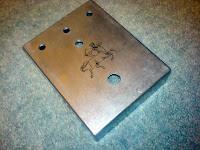
 I applied the graphics in the same way that I did the PCB toner transfer. Here it is ironed on and soaking through ready for the glossy paper to be removed.
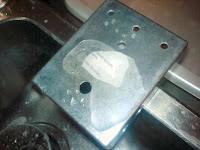
 Here’s the enclosure with the graphic applied. A nice centaur image – just to keep the theme going!
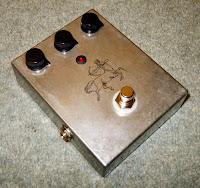
 So, enclosure drilled, graphics applied, PCB etched and populated and wiring done. I’ve got myself a Klon Centaur! See the finished unit below 🙂
 For your comparison here are some images of a real Klon Centaur. I really do like the look of these things. Nice and simple!
So there you have it. A DIY construction of the rare and famous Klon Centaur Overdrive. How does it sound? Just like a real Klon Centaur, nice booster – OK overdrive. I think to be a really great booster and overdrive it needs a few mods. In the near future I will be constructing my own version of the Klon circuit with these mods:
- Separate Gain and Blend pots (The original uses a “dual ganged” pot instead of two individual pots to control the mix of clean signal and overdriven signal.
- Improve the overdrive circuit – that overdrive section could easily be made to sound a little sweeter and a little less “thin” – this is a complaint which I have heard from many Klon Centaur users.
- Diode blend pot – to allow you to blend between two distinct overdrive sounds. It just increases the versatility of the original unit.
- Use a different OPAMP for the buffer/overdrive section. Why use that TL072 for the overdrive section? Why, why, why? I’ve been using a LF353 and it sounds better already! True Bypass?
The schematic below was produced by fully reverse engineering a true Klon, that we bought at freestompboxes and then butchered (By our very own Soulsonic)…
For more info on this project or to buy one of the 100,000 Klown Centaur pedals I have since made please email me. You can find my address at the top of the page… Again; thanks to everyone who has made this build possible – you know who you are, especially MM and MC 😉